While standard audio processing is done through the Left and Right(L、R) channels, M/S processing divides elements into those at the center(Mid) and those on the left or right(Side). For example, it allows you to adjust the effect of the centrally located vocals or make nuanced changes to the width of the mix.
In addition, tracks with sound pressure levels raised to the maximum in stereo processing can often be found to have additional headroom in the Sides when separated into M/S elements. This means you can increase the sound pressure just by enhancing the Sides.
M/S Proc allows individual level adjustment and EQ processing for Mid and Side channels.
Although M/S processing is most often used for mastering, in principle by lowering the Mid you can apply a "center cancel." In this way you can prepare tracks for karaoke or "learning by ear."
We also recommend sending your file to mimiCopy, our "learning by ear" music player app.
M/S Proc has two modes, FILE mode and DEVICE mode. You will use different modes depending on the source of the audio that you are applying effects to.
DEVICE mode allows you to apply effects on audio input from an external source. The app will automatically switch to this mode when you are using Audiobus、Inter-App Audio.
FILE mode is used to apply effects on an audio file. This refers to files that are imported into M/S Proc. You can also use songs from the Music Library by importing them into the app. This mode also enables you to save any effects applied to the file by exporting them as a separate file.
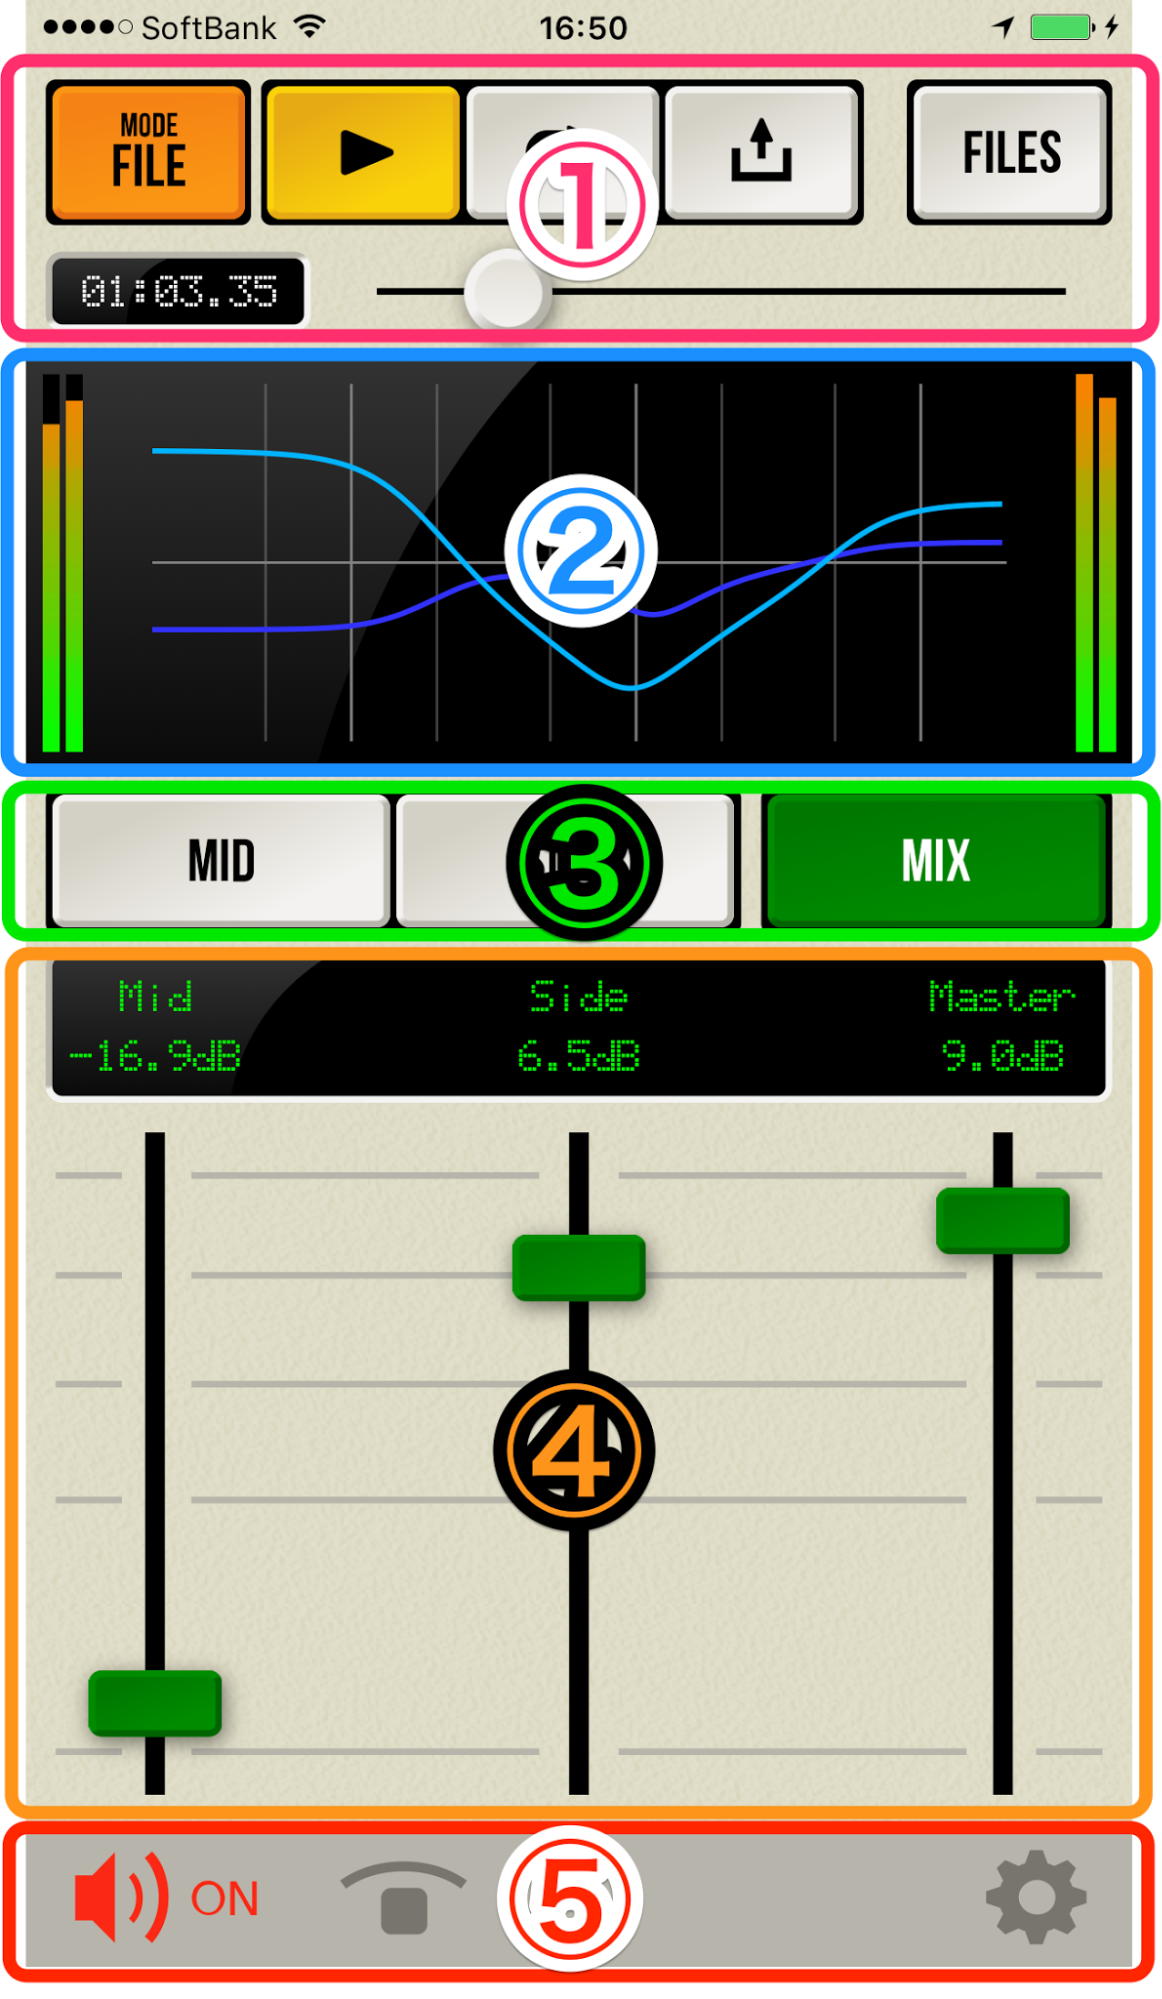
(1) Mode/Player/FILE:LE: Buttons for switching between modes, for the File Player, and for opening the screen to load preset files and audio files.
(2) EQ Graph, Level Meters: Displays a graph that enables you to observe the EQ status visually, and meters to measure the output level (M/S on the left, LR on the right).
(3) Parameter Change(iPhone Only): Switches the parameters displayed in (4).
(4) Parameters: Displays the parameter names, values, and sliders to change them.
(5) Global Function: Effects ON/OFF, bypass, settings: Allows you to turn effects ON/OFF, and switch to bypass. There is also a button to open the Settings screen.
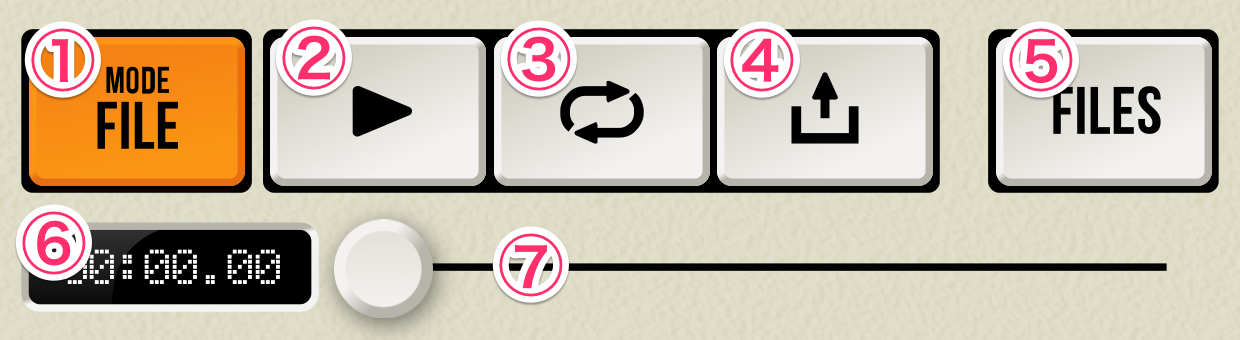
(1) Mode: Switches modes with each tap. (1)(2)(3)(4)(6)(7) are only available in FILE mode.
(2) Play: Begins playback of the loaded audio file. Tap again during playback to stop.
(3) Loop: Sets the loaded audio file to loop playback.
(4) Export: Applies the effects to the loaded audio file and exports as a separate WAV file.
(5) File: Opens the file management screen. On this screen, you can save and load presets, load audio files, import from the Music Library, and more. You can also both create and delete folders, delete files, and export to other apps. See section below for details.
(6) Time Indicator: Displays the current playback time of loaded audio file.
(7) Seek Bar: Displays the current playback time of the file and allows you to adjust it using the slider.
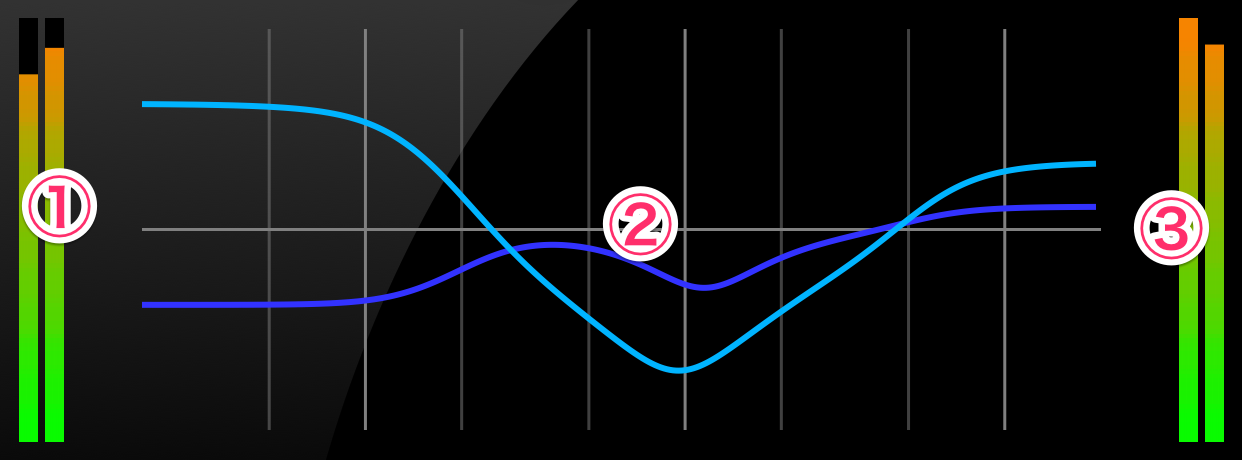
(1) M/S Level Meter: Displays the output level in M/S. The left side displays "Mid", while the right side displays "Side".
(2) EQ Graph: Displays the current status of the EQ in graph format. "Mid" is shown in cyan, while "Side" is shown in blue.
(3) L/R Level Meter: Displays the output level in L/R. The left side displays "L", while the right side displays "R".

Tap to switch between the parameters displayed. When using an iPad, this button is unavailable because all parameters are displayed at the top of the screen.
(1) Displays the parameters for the Mid EQ.
(2) Displays the parameters for the Side EQ.
(3) Displays a slider to adjust the levels for both Mid and Side. And master level.
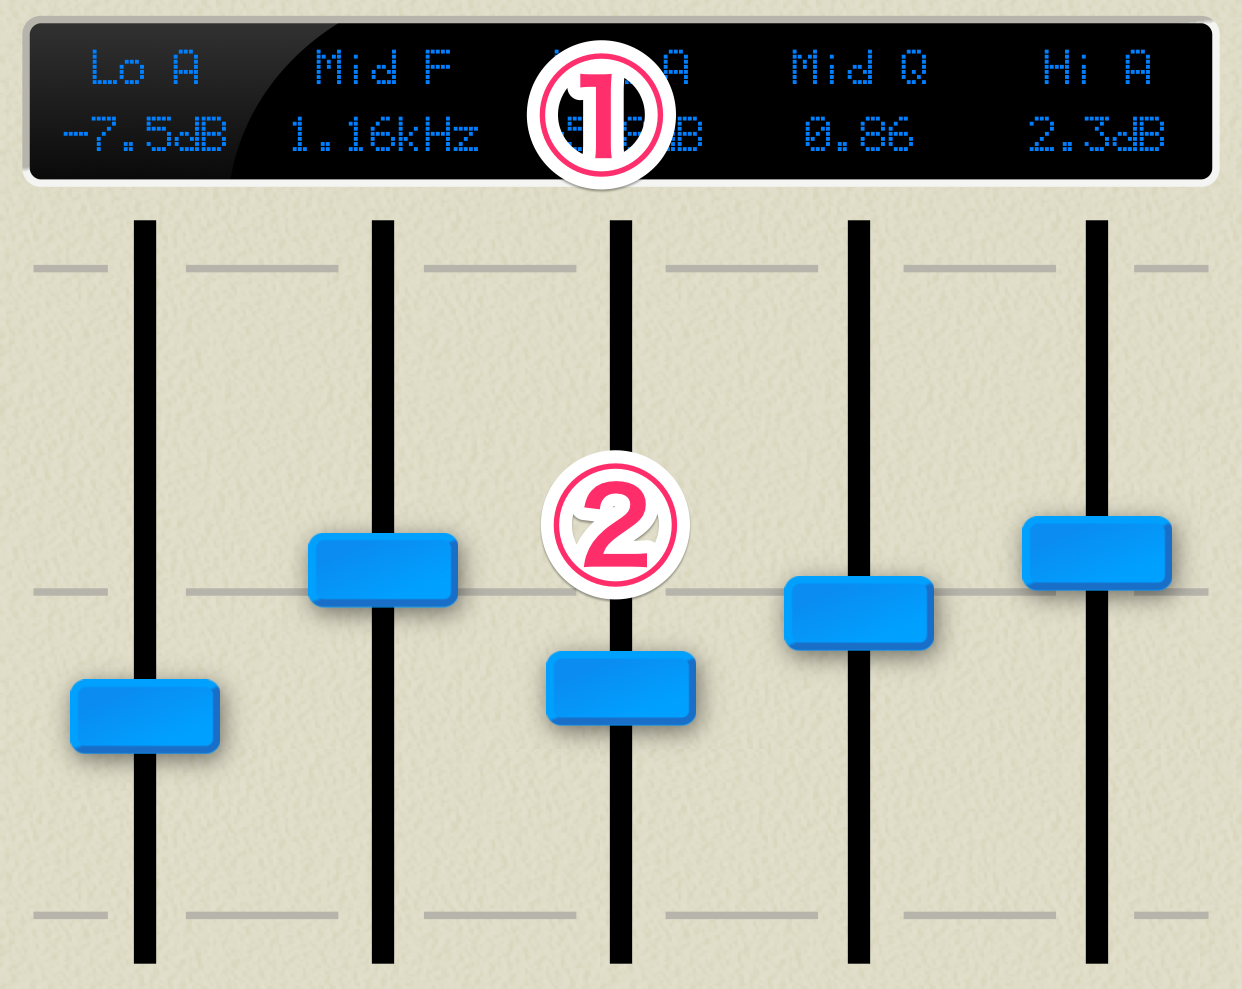
(1) Displays the parameter names and values for the sliders below.
(2) Sliders to adjust the parameters. Double-tap the handles to reset to the default values.

(1) Switches effects ON/OFF. Turning effects OFF will stop processing and stop sound from being outputted.
(2) Ignores all effects and directly outputs the input sound.
(3) Opens the Settings screen.
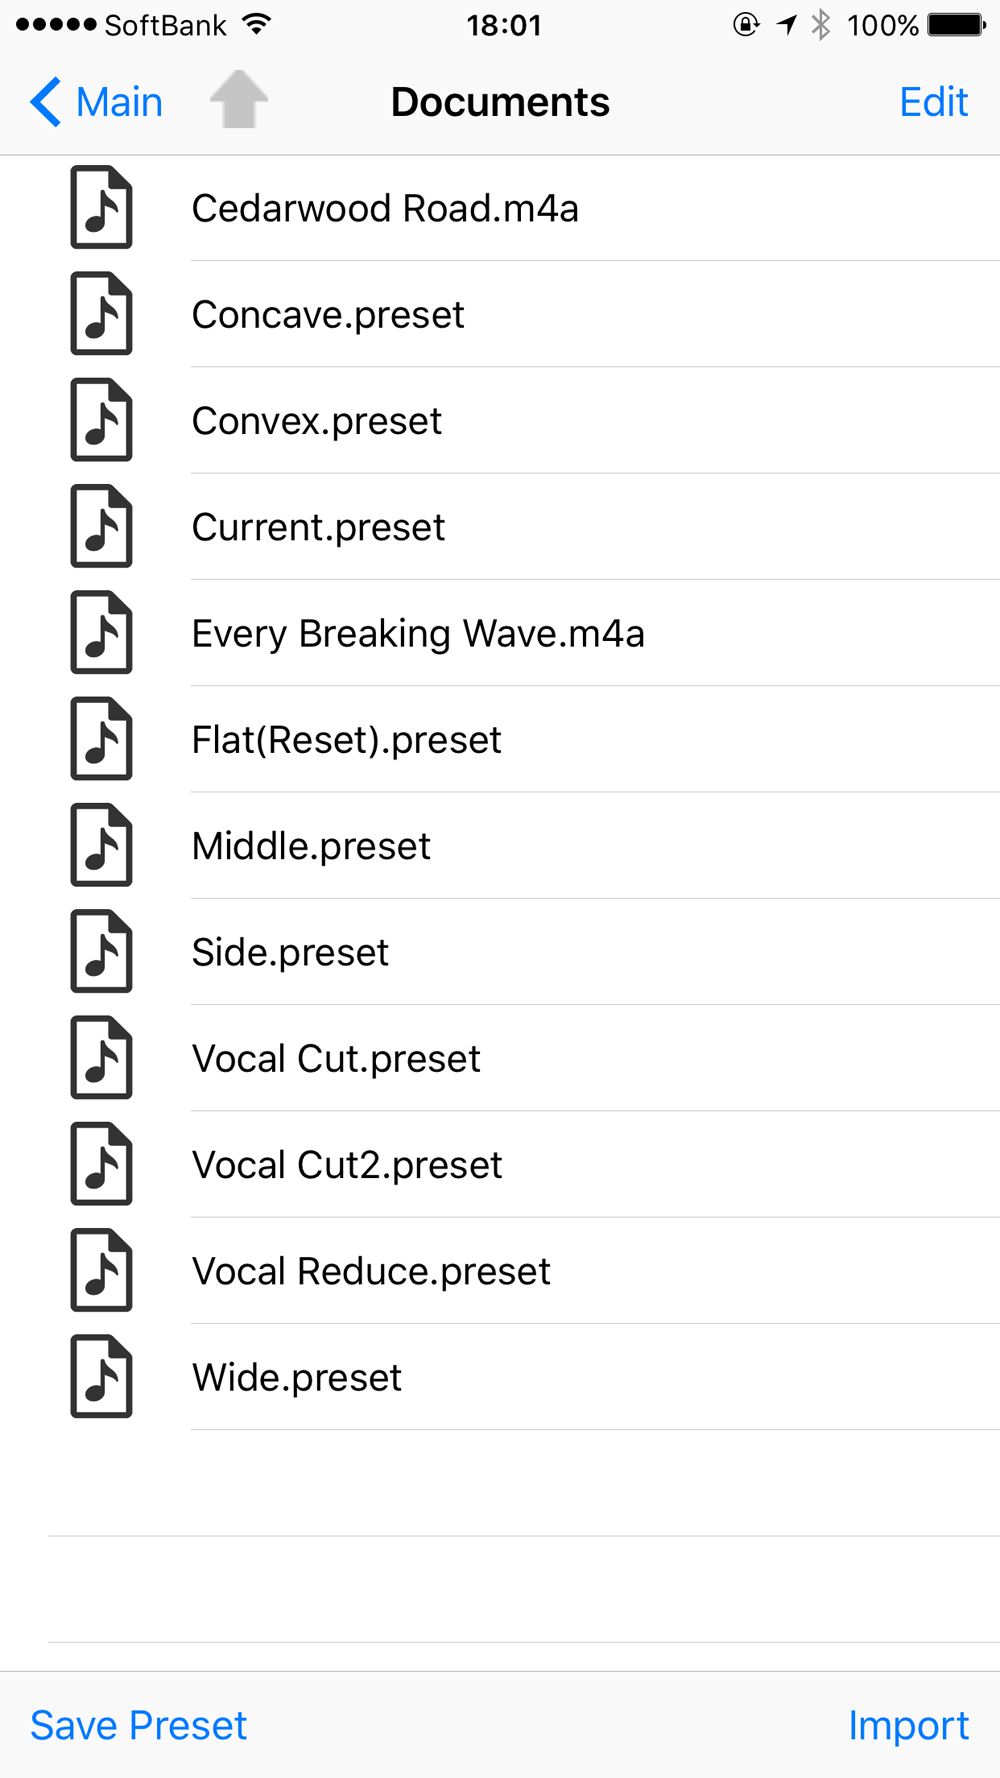
Tap the FILE button to open up the File Manegement Screen(File Screen).
On the File Screen, you can manage folders and files, import files from the Music Library, and export your presets and effects to other apps as a file.
Files made using M/S Proc or imported from external sources will be placed inside of the app's Documents folder. This folder can also be accessed using iTunes on a PC or a Mac.
[How to move between folders]
Tap a folder to move to it.
Tap ![]() to move up a directory level.
to move up a directory level.
You can tap "<Main" to return to the Main Screen from within any folder.
Moving to the File Screen will reopen the previously opened folder.
In M/S Proc, you can save the current status of the parameters as a preset. One file will be created for each preset. Loading a preset will restore the parameters to what they were set to at the time of saving.
Neither the mode selected nor the load status of audio files in FILE mode will be saved into the preset.
Presets will be saved with the ".preset" extension.
To save a preset, set the parameters to the values that you would like to save, and open the File Screen. Then, tap "Save Preset" in the bottom left of the screen.
After inputting the preset name (which will be the filename), the preset will be saved.
To load a preset, tap the preset file that you wish to load from the list. When loading a preset, the status of the parameters prior to loading will be lost.
To load an audio file in FILE mode, open the File Screen and tap the audio file that you wish to load from the list.
The compatible file types are WAV, AIFF, MP3, and M4A. Please note that M/S processing cannot be done on monaural files.
By pressing "Import" on the bottom right of the screen, you can import songs from the Music Library. However, songs that are not stored locally, such as those stored on iCloud or on Apple Music, cannot be imported.
Zip files can be decompressed within M/S Proc.
Zip files downloaded with the iOS browser or attached to email can be opened and decompressed with M/S Proc.
You can decompress zip files by tapping on them in the file screen.
[*Note] It does not work for password-protected zip files.
[*Note] Zip files imported with "Open In..." are copied to the M/S Proc Inbox folder. Files cannot be decompressed in the Inbox, so please move them to another folder for decompression.
In Edit Mode, you can enact the commands in the lower screen Command Bar.
When you select a list item and click a command button, that command function will be enacted. Usable commands are "Select All", "Deselect All", "(Create )New Folder", "Move", "Rename", "Copy", "Delete", and "Open In..." Usable commands become active or not depending on the selected item status.
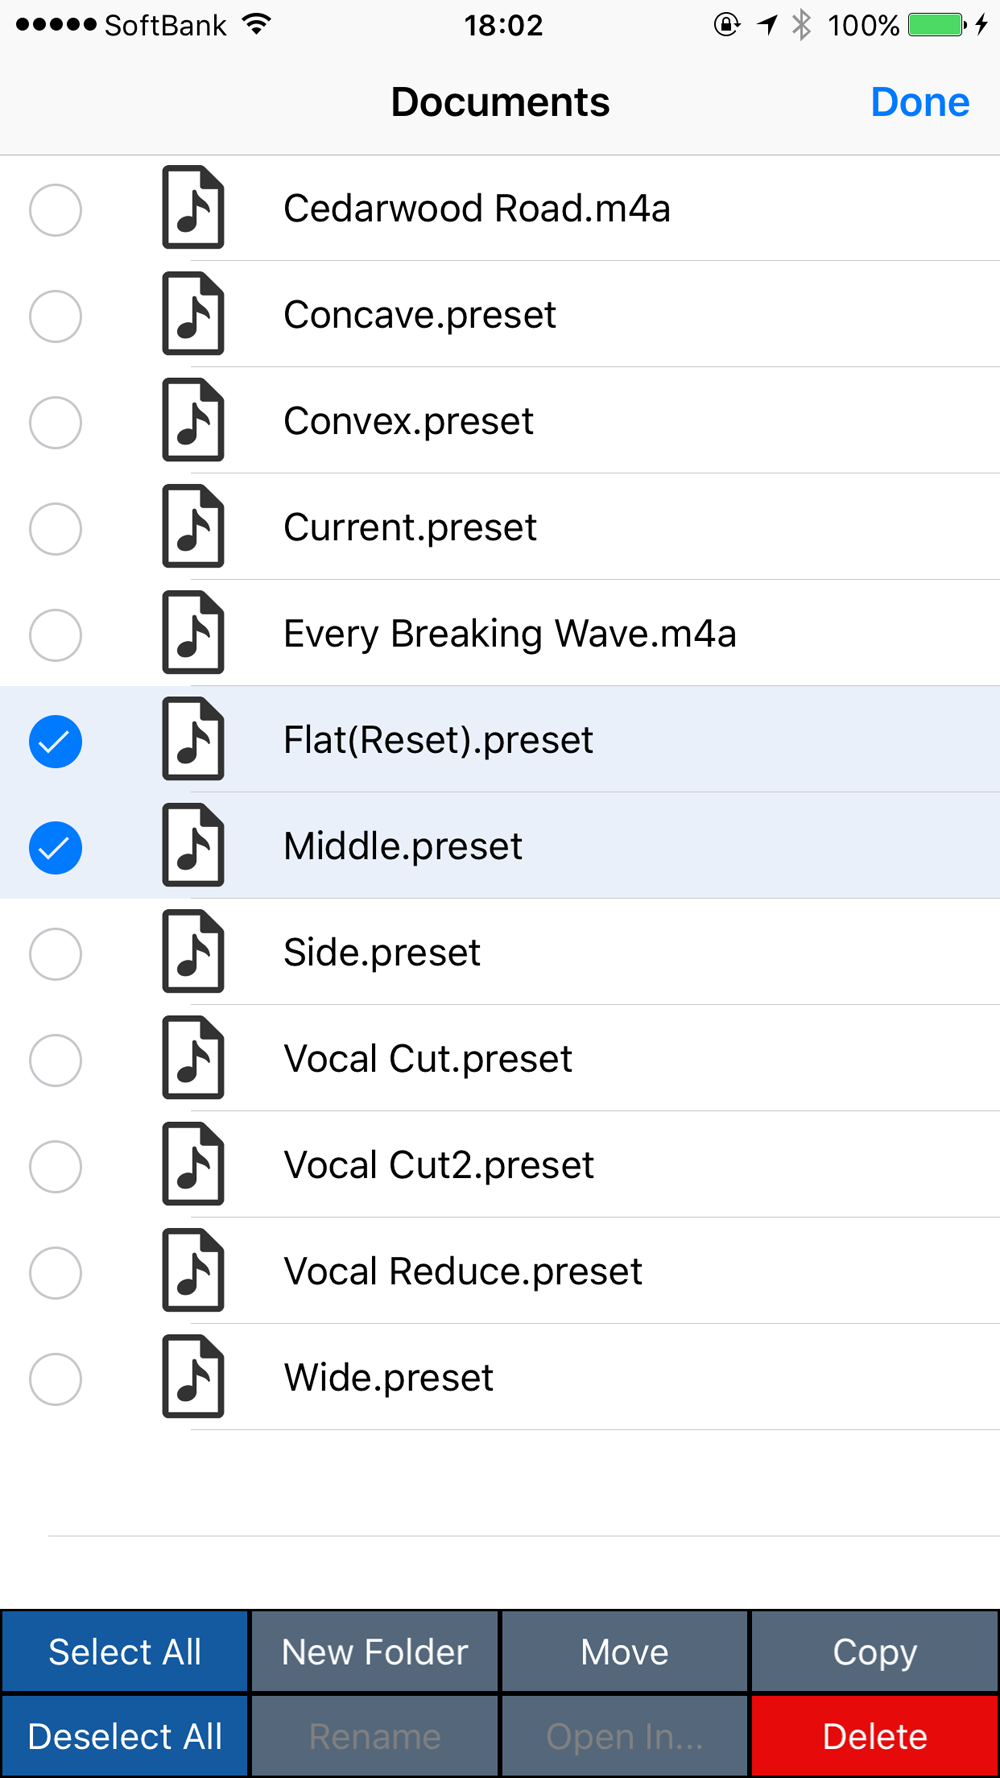
New Folter: Displays the dialog to determine the folder name. Change the name and press "OK" to create the folder.
Move: Moves the selected item to another folder. Pressing "Move" brings up the screen to select the folder into which you wish to move the item, so select the desired folder. Then the folder will be newly created and you can move items into it.
Copy: Copy the selected item into another folder. The method is the same as with "Move".
Rename: Change the name of the selected item. You cannot rename multiple items at once.
Delete: Delete the selected item.
"Open In..." is a share feature that allows you to send files from other iOS apps to M/S Proc.
M/S Proc can open files from other apps using the share feature.
Since the "Open In..." feature is determined by filename extension, files other than those supported by M/S Proc (Wav, Aiff, Zip and preset) cannot be opened. Also, since it is solely determined by filename extension, even if a file can be opened by M/S Proc, it may not run properly, so take care.
Files added using "Open In..." will be copied to the M/S Proc Inbox folder.
If you use "File Sharing", you can insert Impulse response files into iConvolver through iTunes on PC or Mac.
Please see this page concerning "FileSharing".
https://support.apple.com/en-us/HT201301
iConcolver works with Inter-App Audio and Audiobus. Both are the standard for usage with audio music apps.
The Audiobus app is required to use it with Audiobus.
For details, please see the Audiobus site.
Inter-App Audio is the iOS standard. Usually when you set iConcolver within the host app, iConvolver will start up.
Using iConvolver with Inter-App Audio or Audiobus is basically the same as when using it by itself.
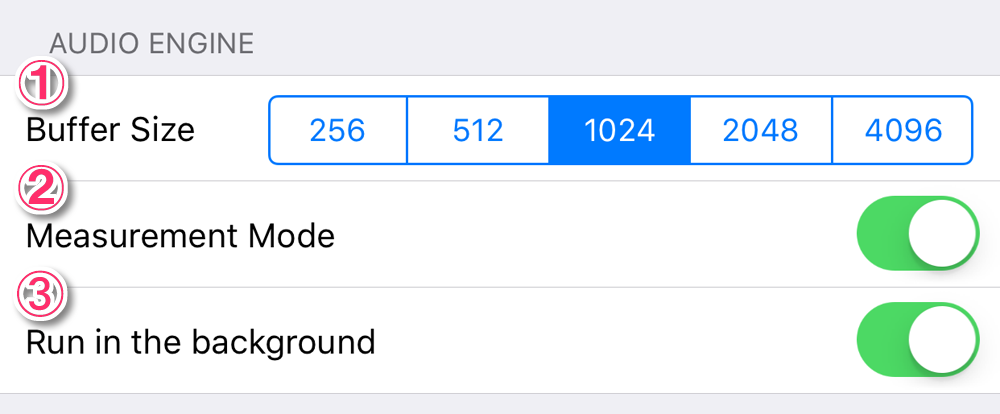
(1) Buffer Size: Sets the audio processing buffer size. Smaller numerics can reduce slowed sound latency, but CPU use is correspondingly high.
(2) Mesurement Mode: This setting is for use with the iOS built-in mic. The iOS mic is fitted with a filter ordinarily meant for phone conversations. This setting removes the filter. This option does not need to be changed in M/S Proc.
(3) Run in the background: When standalone operating iConvolver, set whether to have it run in the background.
This effect is irrelevant when using Audiobus or Inter-App Audio.